
Soil Moisture Sensor
Description
A soil moisture sensor is a sensor that is utilized to measure the amount of moisture present in the soil. It is an essential tool in numerous applications, specifically agriculture and gardening, where keeping a watch on and regulating proper soil moisture levels is vital for ensuring the health and growth of plants.
Sensor Details
A soil moisture sensor is a type of sensor that measures the amount of water present in soil. Unlike the traditional method of measuring soil moisture through drying and weighing, these sensors use other properties of soil such as dielectric constant, electrical resistance, or interaction with neutrons to directly measure the volumetric water content.
The correlation between soil moisture and calculated properties may vary depending on ecological factors such as temperature, soil type, and electric conductivity. The moisture content of soil can affect the reflection of microwave emissions, which is commonly used in agriculture and hydrology remote sensing.
Normally, these sensors are used to check the volumetric water content of soil. Another group of sensors calculates a property of moisture within soil called water potential. These sensors are commonly referred to as soil water potential sensors and include gypsum blocks and tensiometers.
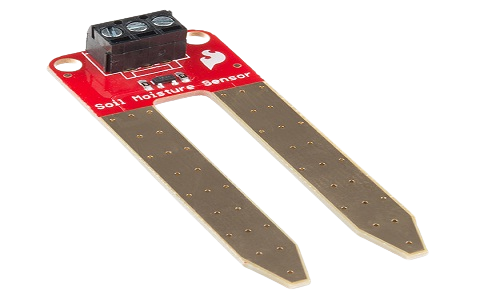
Here is the pin configuration for the FC-28 soil moisture sensor:
- There are 4 pins:
VCC for power,
A0 for analog output,
D0 for digital output,
and GND for ground.
- This module also has a potentiometer to set the threshold value, which is evaluated by the LM393 comparator. The LED will turn on or off based on this threshold value.
Here are the specifications for this sensor:
- It requires 5V voltage to work.
- The required current is less than 20mA.
- The interface type is analog.
- The working temperature range is between 10°C and 30°C.
Wiring Details
To connect an analog soil moisture sensor to your Arduino, follow these steps:
1. Connect the VCC pin of the sensor to the 5V pin on the Arduino.
2. Connect the GND pin of the sensor to the GND pin on the Arduino.
3. Connect the AOUT pin of the sensor to any of the analog input pins on the Arduino, such as A0.
To connect a digital soil moisture sensor, follow these steps:
1. Connect the VCC pin of the sensor to the 5V pin on the Arduino.
2. Connect the GND pin of the sensor to the GND pin on the Arduino.
3. Connect the DOUT pin of the sensor to any of the digital input pins on the Arduino, such as D2.
4. If the sensor has an AOUT pin, connect it to any of the analog input pins on the Arduino, such as A0.
Circuit Image

Circuit Code
//……For analog sensor……

const int moistureSensorPin = A0;


void setup() {

  Serial.begin(9600);

}


void loop() {

  int moistureValue = analogRead(moistureSensorPin);

  Serial.print("Moisture Value: ");

  Serial.println(moistureValue);

  delay(1000); // Add a delay if you want to read the values at a slower pace.

}


//……….For digital sensor……..

const int moistureSensorPin = 2;


void setup() {

  Serial.begin(9600);

  pinMode(moistureSensorPin, INPUT);

}


void loop() {

  int moistureValue = digitalRead(moistureSensorPin);

  if (moistureValue == HIGH) {

    Serial.println("Moisture Detected!");

  } else {

    Serial.println("Moisture Not Detected.");

  }

  delay(1000); // Add a delay if you want to read the values at a slower pace.

}